How to send Mass Emails from Mohid
Communication/Mass Email Service in MOHID™ - User Guide Step by step instructions
Detailed instructions for enabling Communication functionality in MOHID™ to send Mass Email to Donors and Members
Sign up Mailchimp™
Setup a new account with Mailchimp From MOHID™ dashboard
- Go to Settings
- Click Communication under Module Settings.
- Click Mailchimp signup button
Upon Clicking the MailChimp signup button, you will be redirected to the Signup page where you can fill the required information:
Retrieve API Credentials
Get the API Key
After signing in to your account
- Click on NAME or ‘Down arrow’ sign on top right corner
- Click on Account
- Click on Extras and then API Keys
Here you can create a new key by clicking Create A Key button.
Enable Communication service in MOHID™
From MOHID™ dashboard
- Go to Settings
- Click Communication under Module Settings.
- Enter Mailchimp account API Key that was retrieved in previous Step
- Click Save
Create Subscriber’s List in Mailchimp
Go to your Mailchimp account’s dashboard: Lists -> Create List
See your newly created list in Lists section
Go to the list Settings
In settings click on List name & defaults
In List name and Campaign defaults make sure that following fields are properly filled: -
- List Name
- Default from name
- Default from email
- Default Subject line (it is Optional)
After the above information please click Save List and campaign details
Adding/Synchronizing Lists in MOHID™
- Go to Communication
- Click Audience.
- Click Add Campaign List
- Select Mailchimp list that you have recently created in previous section (it should be visible here in drop down select box)
- Select Member’s List type i.e. Community Members, Masjid Members or Donors
- Click Save


This will create a new list in Mohid and will be visible in:
- Communication
- Campaign
- Audience

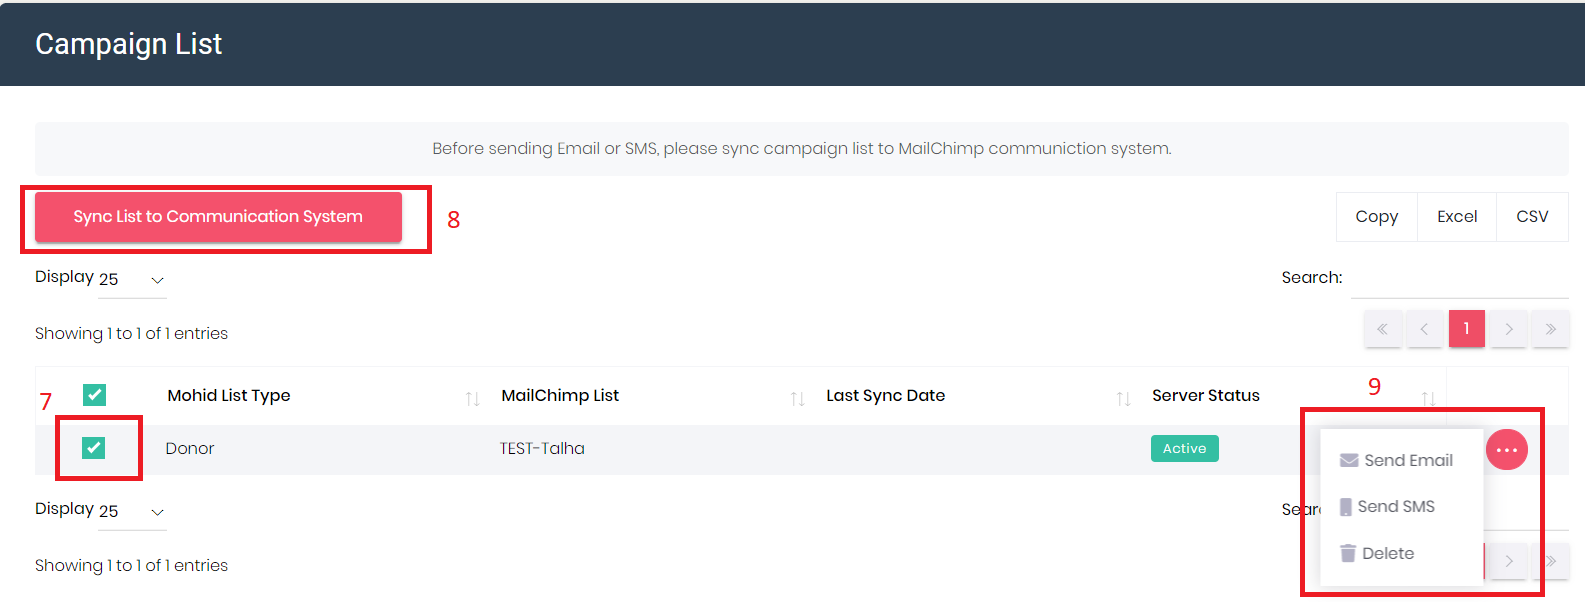
Select the Audience/list and sync it to the communication system.

All the content of newly created list will be automatically synced with your Mailchimp account and you can see same list getting automatically updated in Mailchimp
Create Templates
Templates can be created in MailChimp™ and they will be automatically imported in MOHID
Log in to MOHID
- Communication Module
- Click Campaign
- Click Templates

You can create a New Template
Click Preview Icon for existing template preview and Replicate Icon to replicate and create new version of template using its existing content.
Sending Test Email to verify template
Login to MOHID
- click Settings
- Module Settings -> Communication
Enter Mailchimp Test Email address
Click on Send Test Email after creating Campaign (Refer to next section for How to Create Campaign) to send a test email
Sending mass Email/Newsletter to list
>Go to Communication
>Click Campaign
>Click Audience
>Click Add Campaign List
>Select Mohid List type and Mailchimp List
>Click Save
>Select the newly created Campaign List and Click on Sync List to communication system
>Click the three dots (...) to send email


Note: Please make sure that a campaign is created as shown below before sending email.
>Go to Campaign
>Click on Campaigns
>Click Add Campaign
>Fill in all the required details
>Save


Once the campaign is saved, email can be sent from the campaign screen by clicking (...)

