

Go to Settings on the left hand side
- Click on ''General Settings'' under Report Card SettingsIn this section, the user can define the Date ranges for each term.For example, If your whole Academic session is divided into two semesters or two terms. That can be added here accordingly.Set Duration Field Title: The title name added in this field will be displayed on the Report Card Screen.Duration Start and End Date: Add the duration start and end date for each termDuration Title: You can add the title like Mid Term, Final Term / Semester wise.Click on the '+add duration field' sign to define one or more duration titles.
Note:
Please select the Duration Start and End Dates between the Current Academic Session Dates.
Marks of only those Assignments, Quizzes etc will be displayed that are assigned between the specified Duration Start and End Dates.
Please note that the Duration 'Start' and 'End' Dates for each duration must not overlap.

For example: If in your school for Grade “A”, defined obtained percentage range/marks range is 81%-90%, then you need to enter 81 in From and 90 in To. Similarly for other grades/scores you can define percentage range accordingly, as shown in the image below.
In the Grade column only Grade letters need to be provided, I.e. for 81 to 90 present you can define letter "A".
In "Note" you can write remarks. i.e Good/ Excellent or Below average according to the Grade and click Save Default
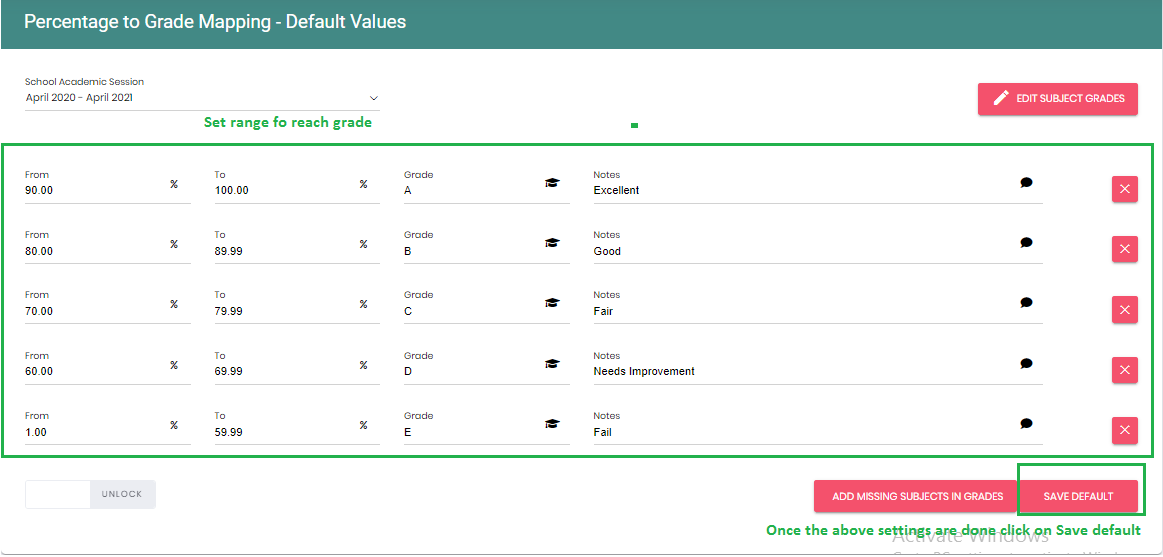
Add Missing Subjects in Grade - This option allows the user to update the newly added Grade/course and Subject in the existing list. For example: users configure Grade Card settings and then add new course/grade or subject in school then to update this Grade Card setting they need to click on "Add Missing Subject in Grade" in order to update list of Grade/courses and subjects for Grade Card settings.


On this screen all possible attributes are already provided to define weightages for. If any attribute is not required, the user can enter "0" in the weightages column.
For Weightages- it is up to the user and the school management what weightage they want to define for each attribute, but sum of weightages for all attributes must be equal to 100. - For example: We have defined a 50 for Exam and another 50 is divided into rest of the attributes to complete a 100.
"Notes" option is available if it is required to add any further information.
Users can add more rows in order to fulfill requirements. For example: An attribute of “Behavior” or “Participation” can be added to be a part of grading card calculations.
Default Attribute rows cannot be deleted, whereas new added rows can be deleted.
Save Default- Once all the required fields are updated, click on “Save Default" button, by clicking this button your entered information will be saved as default and screen will be locked. For editing you need to switch the button from locked to unlock and then make changes.
Note: system will ask for a confirmation, Kindly click on yes
Edit Subject Attribute - If the user needs to edit an attribute for any particular subject, there is this option available.
By clicking on Edit Subject Attribute button, edit window will appear as shown below.
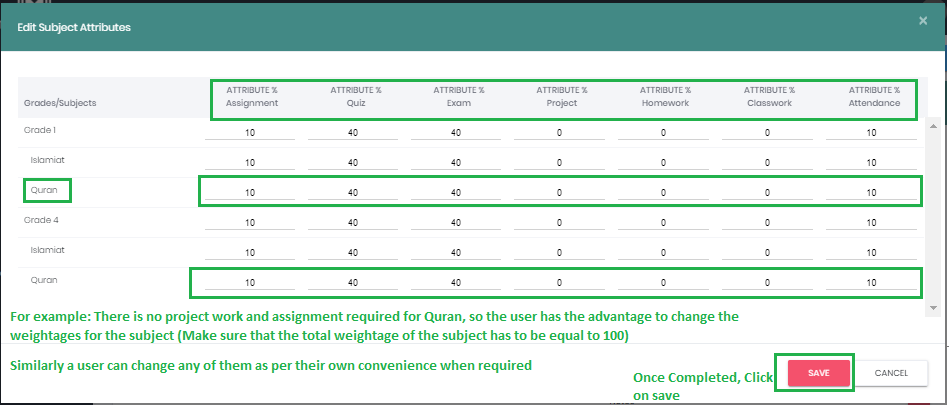
Click on "Save" once done.
Save Default - "Save Default" option is provided, if the user makes changes to any attribute's weightage by clicking on "Edit Subject Attribute" and then wants to set back to default settings for all the subjects again. Then click on the Save Default option in order to reset settings of Attribute Weightages.
-Add Missing Subjects in Attribute - This option allows the user to update newly added Grade/course and Subject in existing list. For example: If a user configures Grade Card settings and then adds a new course/grade or subject in the school then to update this Grade Card setting they need to click on "Add Missing Subject in Grade" in order to update the list of Grade/courses and subjects for Grade Card settings.
Realtime Report card View
This screen can be viewed from Admin, Teachers' and Parents' Portal, as it works in real time so that as soon as information is updated here it will reflect on all portals automatically.
In order to view these screens
Go to Academics on the left hand side
Select grade
Click on search
Click on report card
A real time report card screen will appear

Realtime Report card View - a) Subject wise Report Card b) Student wise Report Card
a) Subject wise Report Card
Go to Academics on the left hand side
Select grade
Click on search
Click on report card above the grades subjects
A real time report card screen will appear
Click on the subject tab
Select subject name
Select the Report duration field
Click on search
List of Students will appear for this subject. In order to edit marks, click on the edit button.
Update marks.
In the actions column click on "Update Marks" in order to save changes.

Note: The last three columns are for Attendance, Percentage and Grade and cannot be edited as these 3 are calculations based.

b) Student wise Report Card
Go to Academics on the left hand side
Select grade
Click on search
Click on report card above the grades subjects
Click on the student tab
Select the duration field for the report card
Click on search

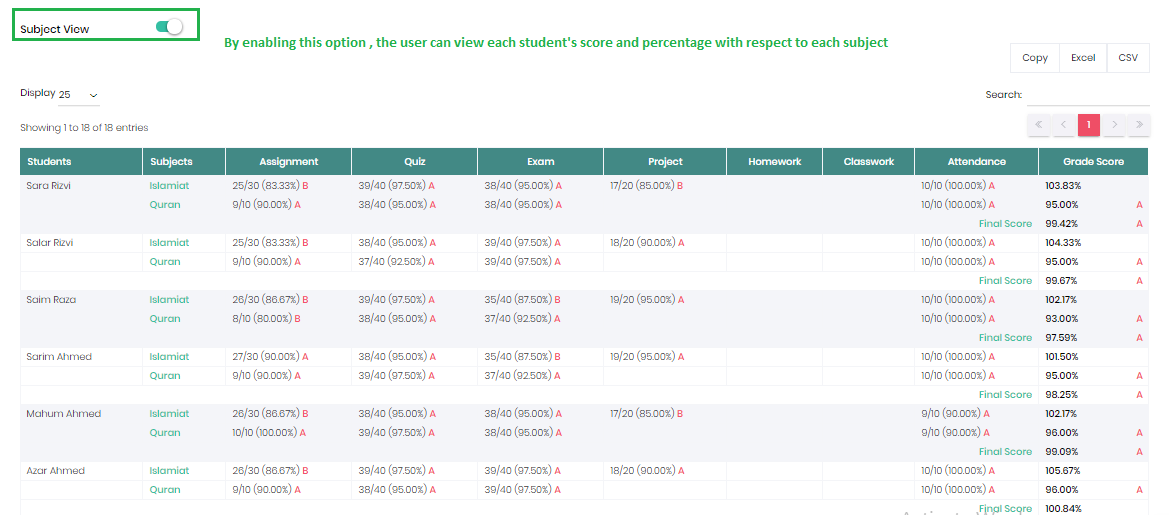
With this screen the user can view complete details of each student's Grades and obtained marks.
With clicking on the subject view, the user can view student’s each subjects score separately
Users can view each attribute's percentage/Grade and marks.
The users can view all students' details from this screen, whereas parents can view details of their own kids through parent's portal.
Report Card Generation
Go to Academics
Select grade
Click on Search
Click on report card above the grades subject list
After clicking a real time report card screen will appear
Click on the generate report card button

This screen is only available for Admin to review and edit information before creating the final report card.
Once clicked on generate report card button, the following screen will appear
The user will select the subject that they want to edit and finalize
Select the duration field for the report card
Click on search

This is the Final screen to create a Report Card, when teachers update marks on the Real time Report Card screen, then Admin can recheck all information from this screen and if required, he/she can exclude any marks (for any attribute). Then click on "Save".
.
If it is required to exclude any attributes marked for all students then uncheck the option of total marks from Heading, it will exclude this attribute's marks for all students.
If it is required to exclude any attribute's marks for a specific student then uncheck the box in front of the specific student’s name , it will exclude this attribute's marks for this student for the selected attribute.
Once done with completing the marks entry, click on Save

Click on continue
The user can edit the information of the grade’s respective grades.
After clicking Continue, the user will see the below screen, From this screen the user can add remarks for a student and view their report card


Once the user has added all the remarks, they can select the students for whom they want to generate a report card.
Check the box on the extreme left column of the table
The user can select all students by selecting the top most checkbox.
After selecting , Click Continue
Generating PDF
Check mark the option of "Display Attributes level Detailed report " and "Show Subject Remarks" according to your requirement.
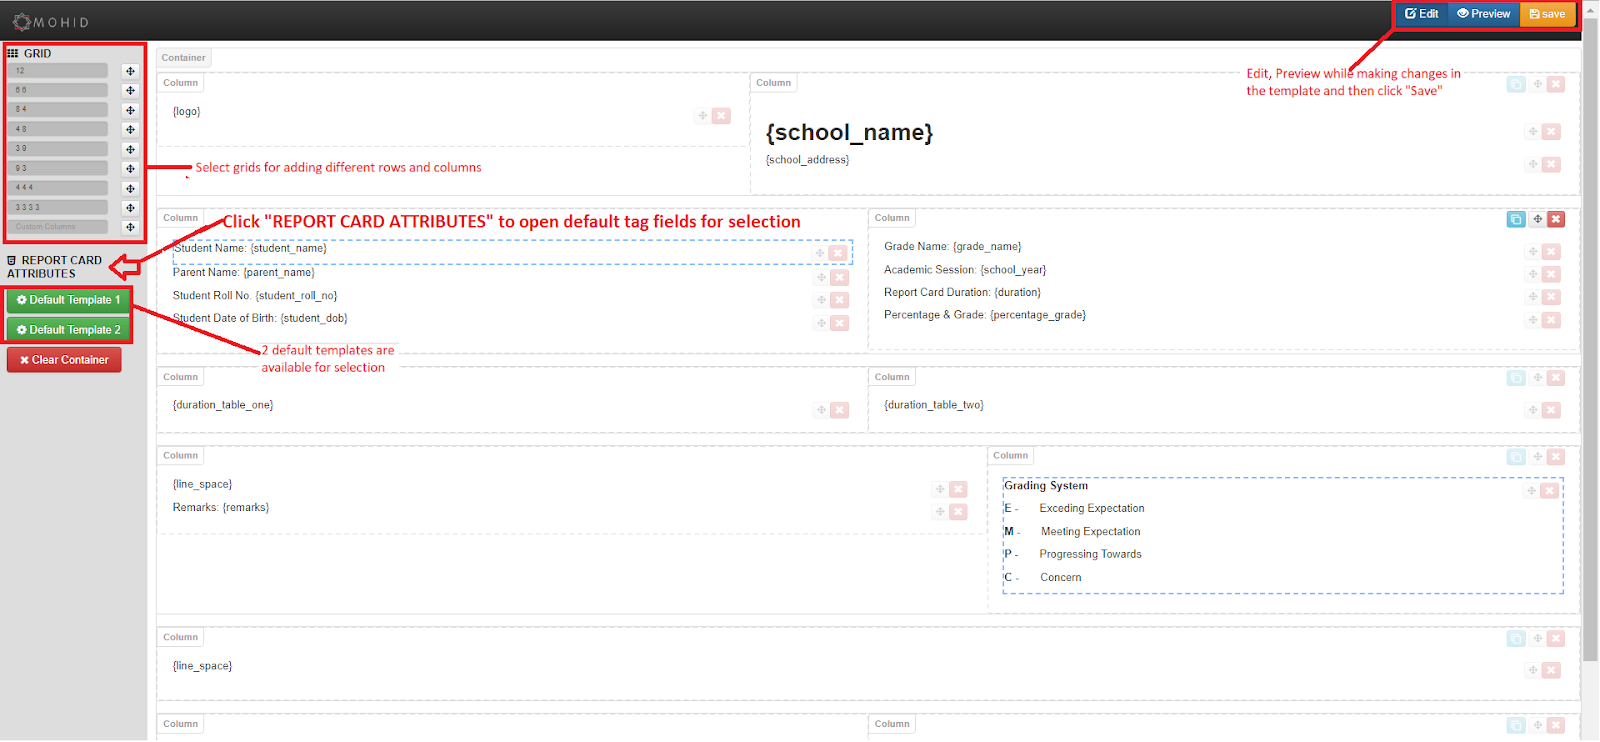
Click on "Compose Template" to customize or select any of the two default templates added in the system as per your requirement.
Click on "Preview Report Card" once the report card is composed to see how it will look before going to the next step which is report card generation.
Once done, click on generate pdf file

Compose Report Card screen:
Note: Please do not open report card template composer in multiple windows.
Once clicking on “generate pdf file” the following message will appear on the screen.

Now click on "Execute Generation Process" Button just after Generating pdf file of report card .

Individual or combined report cards can be downloaded from view completed reports screen:


Now publish report card on parent portal:
- Go to, Academics > Click on "View Completed Reports"
- Click on "Publish Report Card"


Note: In order to create report card in Muntazim, it is required to mark attendance and add assignments to fulfill the report card requirements.
Please refer below articles to add/update attendance and add assignments.
How to add and assign assignment
If a non-zero weightage is assigned to attendance then