
Note: Assignments can only be added after a subject is associated with the selected grade. If the association has not been set up, please refer to the articles below to complete the required setup.
There are two options available to manage the assignments and marking in the system:
In order to add and assign an assignment from admin, Kindly follow the steps indicated below:
Step: 1 - Adding an assignment
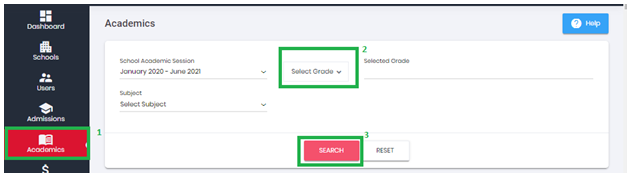
Go to academics on the left hand side
Select grade from the drop down menu
Click on search button
Click on assignments button
Click on add assignment button
Fill in the basic information and click on continue.
Add Features of the assignment ,
Select assignment type from the drop down menu
Select assignment date ( assignment date is the day when assignment is assigned to the students), system gives you ability to select date as per requirement and it can be future date as well.
Select assignment due date (Due date is the day by which assignment must be done).
Click on 'Select File' to upload file (if required any).
Click on Save.


Step: 2 Assigning the assignment
After adding assignment
Go to academics on the left hand side
Select grade from the drop down menu
Click on search button
Click on assignments button
All the added assignments will list on this screen by default.
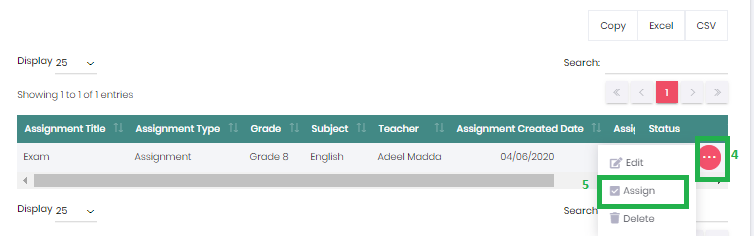
Click on the 3 dot icon on the right most column in the table.
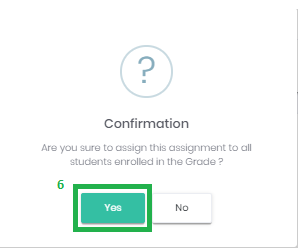
On clicking Assign option, the system will ask for confirmation:
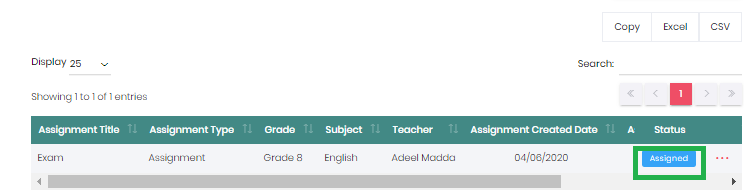
After the admin selects yes in the confirmation message. The assignment is assigned the status will be changed from "Active" to "Assigned".

Note:
- If Assignment is in Open/Reopen status and a new student is enrolled then the following assignment will automatically be assigned to that student. i.e. Assignment list should automatically update. If Assignment is Completed then newly enrolled students will not be listed on the following assignment.
Step: 3 Receiving an assignment
Go to academics on the left hand side
Select grade from the drop down menu
Click on search button
Click on assignments button
All the added assignments will list on this screen by default.
The assignment that has been assigned to the students of the particular grade will be having the status as assigned. Once the teacher or the admin has received the assignment, they can add marks/remarks in the system.
For adding marks ,click on the 3 dot icon on the right most column in the table.
Click on receive.

Step: 4 Adding Marks / remarks for an assignment
On clicking the Receive icon, "Receive Assignment" (Compilation) page will appear on your screen.
Select status of assignment from status column
Select submission date from drop down menu
Kindly Input marks and remarks.
If there is more than one student who has submitted the assignment and the admin wants to add the same status and submission date to submitted assignments then they can select the "Copy status and submission Date" button.
Click Save only will allow you to make changes for the same screen.
Click save and complete (after clicking the save button the admin won't be able to edit the marks if needed)

Note: Only enrolled students will list on the Receive Assignment screen, unenrolled students will not appear on the list.